THE LAB 33: Fingerprinting at different connection layers
Excerpt
How to create and test a scraper with a coherent fingerprint between the different layers
Fingerprinting has been one of the hot topics of this newsletter but there’s a reason for this: it can determine the success or the failure of your scraping projects.
In this post, we’ll see the different layers of fingerprinting and how we can test it and forge a new one, layer by layer.
IP Addresses, the map of the internet
Every device connected to the internet has an IP address and when we connect to a website, we’re establishing a connection from one address (ours) to another (the server’s).
IPv4 and IPv6 are different versions of the Internet Protocol. The format for IPv4 addresses is four sets of numbers separated by dots, like: 80.120.119.118. Since the number of IPv4 addresses available is limited to 4.3 Billion, it’s been introduced the IPv6 protocol which uses a more complex format that utilizes sets of numbers and letters separated by single or double colons, like 2013:d839:2342:802::129d.
IP addresses have also a reputation since there are several services that register addresses used by spammers and botnet attacks, or some of them have been assigned to government organizations and have a sort of candid history. Also, some cloud providers share the address list of their data centers, allowing these services to detect if requests come from there or from a residential house.
That’s why proxy providers exist and they compete for having in their IP pool the most valuable IPs (the ones with the best reputation), offering different types of addresses (datacenter, residential, and mobile mainly).
Luckily, it’s quite easy also for us to check the quality of the IPs used by our scrapers. There are many available API endpoints we can use to check our IP, like this one provided by Smartproxy: https://ip.smartproxy.com/json or this package called ASN.
TCP: the Transmission Control Protocol
The Transmission Control Protocol ensures the packets are reliably delivered, and error-free between two devices. As with other protocols, the way the TCP works could lead to OS detection. By capturing TCP/IP fields such as initial packet size, initial TTL, window size, and whatever flags messages come with. In fact, different operating systems, and different versions of the same operating system, set different defaults for these values. By collecting and examining these values, one may differentiate among various operating systems and implementations of TCP/IP.
If you’re interested in more details, you can read this article by NMAP team where they explain how NMAP can determine the operating system of a device. It’s incredible, in my opinion, how precise this technique could be, since it’s possible to detect slightly different versions of the operating system with a single command.
Once installed nmap on your system, launch this command
nmap -sS -p 80 -O -v www.website.com
and for many websites, you can understand the operating system where it’s running.
PORT   STATE SERVICE
80/tcp open  http
Warning: OSScan results may be unreliable because we could not find at least 1 open and 1 closed port
Device type: general purpose|specialized
Running (JUST GUESSING): Linux 5.X|4.X|3.X (91%), Crestron 2-Series (85%)
OS CPE: cpe:/o:linux:linux_kernel:5 cpe:/o:linux:linux_kernel:4.10 cpe:/o:crestron:2_series cpe:/o:linux:linux_kernel:3
Aggressive OS guesses: Linux 5.0 - 5.4 (91%), Linux 4.10 (91%), Linux 4.15 - 5.8 (90%), Linux 5.0 - 5.5 (90%), Linux 5.4 (88%), Crestron XPanel control system (85%), Linux 3.2 - 3.16 (85%), Linux 3.2 - 4.9 (85%), Linux 4.4 (85%)
No exact OS matches for host (test conditions non-ideal).
Uptime guess: 0.000 days (since Sun Nov 26 16:54:11 2023)
TCP Sequence Prediction: Difficulty=250 (Good luck!)
IP ID Sequence Generation: All zeros

Read data files from: /usr/local/bin/../share/nmap
OS detection performed. Please report any incorrect results at https://nmap.org/submit/ .
Nmap done: 1 IP address (1 host up) scanned in 4.32 seconds
           Raw packets sent: 73 (6.800KB) | Rcvd: 22 (1.620KB)
If you want to check the TCP fingerprint of your scraper, there’s this useful API built by Incolumitas, where you can see what’s the best guess of the operating system. In this example, you can see the best guess when I tested the API from my MacBook.
{
  "avg_score_os_class": {
    "Android": 4.25,
    "Chromium OS": 2.58,
    "Linux": 3.23,
    "Mac OS": 12.6,
    "Windows": 1.4,
    "iOS": 12.72
  },
At the moment I’m not aware of a specific package able to spoof this fingerprint, so we’ll proceed by creating a compatible fingerprint on the other protocol layers.
TLS: the Transport Layer Security Protocol
The TLS protocol ensures communication privacy by using cryptographic protocols to provide security over a network. When a server and client communicate using TLS, it ensures that no third party can eavesdrop or tamper with any message.
Before encrypting the traffic, the two devices exchange a “handshake”, passing some information called ciphers, used to agree on the supported encryption method to use for the communication. These ciphers are presented in a certain order, which varies from browser to browser. A popular implementation of TLS fingerprinting called JA3 hashes these ciphers together with other data and creates a string out of it.
This string is compared against a list of other legitimate results to understand if the client is a bot or not.
If you’re curious about the JA3 string of your browser, you can use this TLS API from browserleaks website.
Since the TLS fingerprint depends on the browser implementation of the TLS protocol, there are some tools in Python that allow us to impersonate different browsers, mimicking their fingerprint.
We’ve seen an example of these packages with Scrapy-impersonate on this previous The Lab article
or more recently with hrequests.
In the example in our GitHub repository available for paying readers, I’ve written a small Scrapy spider that outputs the result of the Scrapy impersonate package, using the browserleaks API.
If you’re one of them and cannot access to the repository, feel free to write me at pier@thewebscraping.club with your GitHub username.
GitHub Repository for paying users
You’ll see that the JA3 strings will change when the browser changes but the HTTP headers won’t because they’re passed by the Scrapy settings. This means we should add the HTTP headers coherent with the browser we’re mimicking.
HTTP Requests, the scraping starter pack
As mentioned before, one of the most common ways to scrape a website is to change the default HTTP headers of the requests made by the chosen tool to mimic requests coming from a common browser.
This is one of the oldest techniques used in web scraping and the easiest to implement. As an example, in Scrapy, you can do it by modifying the default settings in the settings.py file.
By opening the network tab on the browser’s developer tools, we can inspect how a request is made, with all its headers, and the response received.
[

To mimic this request, in Scrapy we can modify the default headers of the requests we’ll make both in the settings.py file using the parameter DEFAULT_REQUEST_HEADERS, which will be used for every request which doesn’t have any other request specified.
DEFAULT_REQUEST_HEADERS = {
"accept": "text/html,application/xhtml+xml,application/xml;q=0.9,image/avif,image/webp,image/apng,*/*;q=0.8",
"accept-language": "en-US,en;q=0.5",
"cache-control": "max-age=0",
"sec-ch-ua": "\"Brave\";v=\"119\", \"Chromium\";v=\"119\", \"Not?A_Brand\";v=\"24\"",
"sec-ch-ua-mobile": "?0",
"sec-ch-ua-platform": "\"macOS\"",
"sec-fetch-dest": "document",
"sec-fetch-mode": "navigate",
"sec-fetch-site": "none",
"sec-fetch-user": "?1",
"sec-gpc": "1",
"upgrade-insecure-requests": "1"
}
Alternatively, you can set custom headers on each request you make in the main scraper.
CUSTOM_HEADERS = {
"accept": "text/html,application/xhtml+xml,application/xml;q=0.9,image/avif,image/webp,image/apng,*/*;q=0.8",
"accept-language": "en-US,en;q=0.5",
"cache-control": "max-age=0",
"sec-ch-ua": "\"Brave\";v=\"119\", \"Chromium\";v=\"119\", \"Not?A_Brand\";v=\"24\"",
"sec-ch-ua-mobile": "?0",
"sec-ch-ua-platform": "\"macOS\"",
"sec-fetch-dest": "document",
"sec-fetch-mode": "navigate",
"sec-fetch-site": "none",
"sec-fetch-user": "?1",
"sec-gpc": "1",
"upgrade-insecure-requests": "1"
}
#READING EXTERNAL FILE FOR LOCATIONS
LOCATIONS = location_file.readlines()


def start_requests(self):

for url in self.LOCATIONS:
yield Request(url, callback=self.parse_main, meta={'base_url':url,'impersonate': 'chrome110'},  dont_filter=True, headers=self.CUSTOM_HEADERS)
Web API and browser fingerprinting
On top of all the layers we’ve seen before, there’s the application layer, in our case the web browser.
We’ve seen in some past articles what are browser APIs and how they contribute to browser fingerprinting.
Since websites have become more and more complex, with graphic and audio rendering that needs to be coherent across multiple devices, every modern browser has built-in hundreds of APIs that expose information about the device where it’s running.
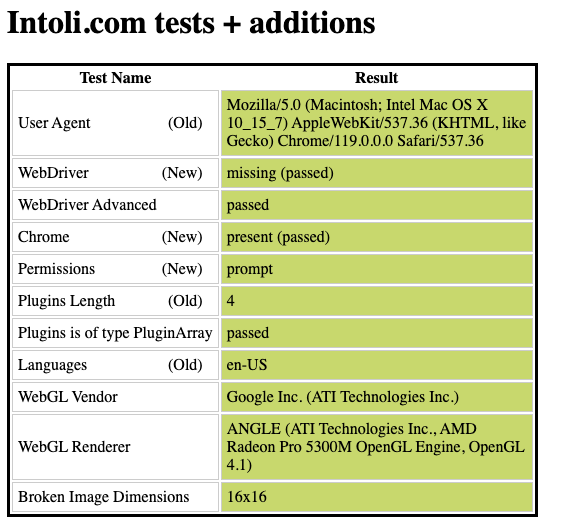
Let’s see what it means for web scraping with two example scripts, run on a datacenter, using Ubuntu as an OS. In both cases we’ll open the Sannysoft test page in order to get some potential red flags.
The baseline for the tests is opening the test page with my browser (actually I’m using Brave).
[
[

I’ve got all the green lights on the initial tests and the audio and video devices are correctly recognized.
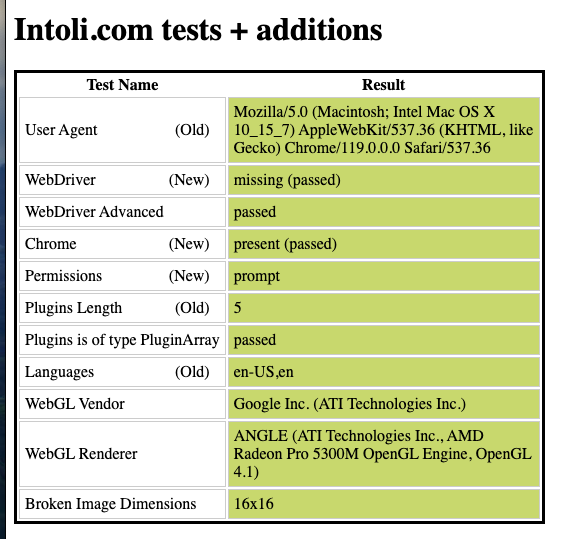
The same happens when I use Playwright and a Chrome instance, with the proper flags set to hide the browser automation.
[

[

This means that, in the eyes of the target websites, it could be very hard to distinguish the human from the bot, when the script runs on a legit machine.
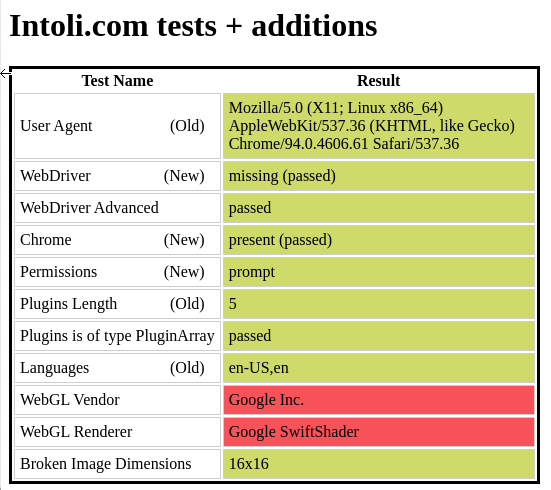
But if the same script runs on a datacenter, here’s the result:
[

[

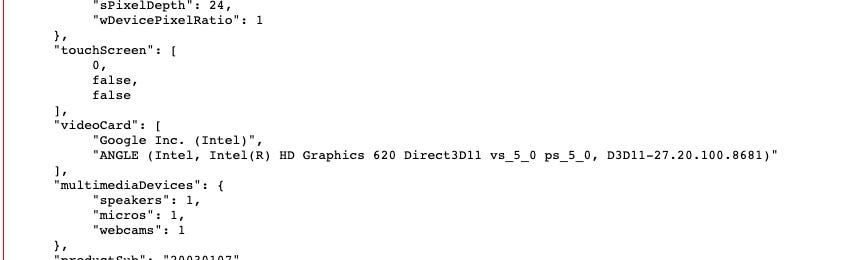
The user agent changes coherently with the setup but we have a red flag over the WebGl vendor and renderer. In fact, since datacenters don’t have monitors (and also audio devices like you can see from the second picture), there’s no need neither for a 3D card, which is available probably on every modern device sold today. Google SwiftShader is a technology that allow the graphic rendering via the CPU of the machine, and that’s why it’s seen as a red flag from anti-bot solutions.
The issue with device fingerprinting is that there’s no opt-out from it, since the information we’re sending to the target server is embedded in the browser we’re using.
That’s why there are more and more anti-detect browsers like GoLogin and Kameleo which spoof some of the browser API results to hide the real device setup.
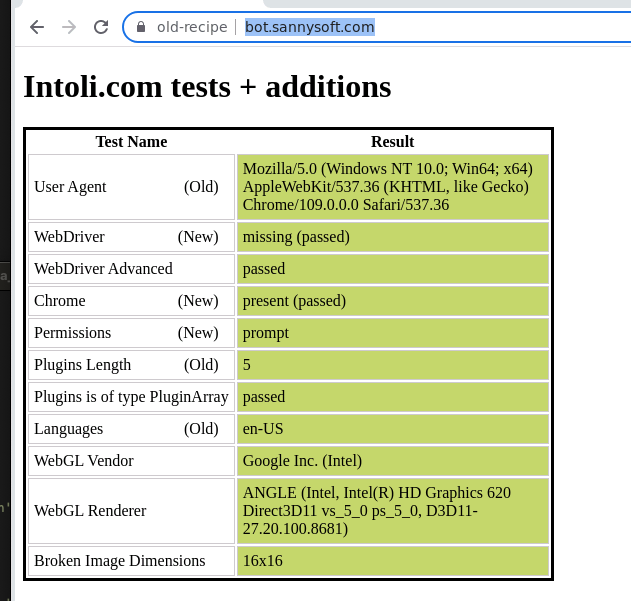
In the last test, I’ve used a profile created with GoLogin to simulate a Windows OS device with a real graphic card and a monitor, webcam and microphone.
[

[
No more red flags!
If you’re curious of how I’ve implemented the two small tests, you can have a look at the GitHub Repository for paying readers. If you’re one of them and cannot access to the repository, feel free to write me at pier@thewebscraping.club with your GitHub username.
GitHub Repository for paying users
So we have a silver bullet to scrape all the websites in the world?
No way.
First, in terms of execution costs, this solution is expensive since headful browsers need memory and GPU to run and performance tend to degrade over time during the scraping process.
On top, with anti-detect browsers we solve the browser and device fingerprint made via browser APIS but not the TLS one.
If an anti-bot relies more on TLS fingerprinting, a Scrapy-impersonate project could be enough. Or we can use a mixed approach with hrequests, where we can load the Home Page of the website with Playwright, just to get the Ok from the antibot, and then using a traditional request approach making the most out the previously gathered cookies.
Depending from website to website (and some time from website’s section to section) we need to understand what’s the right tool to use, in terms of efficiency and success rate. And knowing more and more tools gives us more choices in this cat-and-mouse game.